

It’s been a while, but the Laundry/Powder room is finally finished. For those who haven’t read the previous posts, my laundry room is in the main floor powder room. It’s quite convenient actually, but it’s never been pretty…. until now.
Here’s a sneak peek

Project Recap:
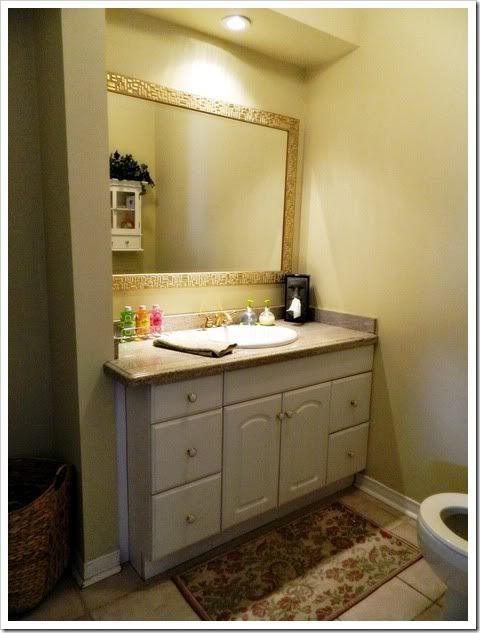
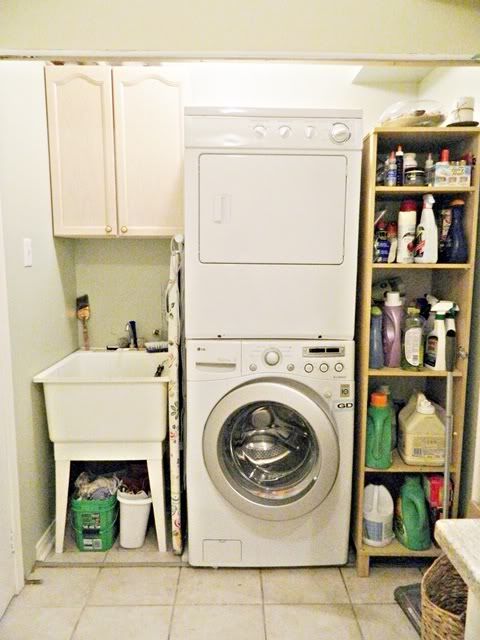
This before picture shows the bathroom vanity. To the left of the little wall jutting out, is my laundry area.

Remember there were large bi-fold doors concealing all of this, but at this time of this picture they were already removed.

Now…. take ALL of this…. and demolish it.
**Lisa’s Advice – Don’t demolish two months before you can start the project**
Lesson learned.

The only thing salvaged and worth keeping from this entire room was the sink.

Plumbing was moved behind the washer and dryer to the far left to accommodate a small sink, (which I opted to leave out at this point). Electrical, pipes and vents were moved as well.

In the previous post we covered wallpapering the room and painting some Ikea Doors bringing us to this point. Undermount lighting was installed.
![Laundry_powder_room_makeover1_051a_thumb[6]](https://blogger.googleusercontent.com/img/b/R29vZ2xl/AVvXsEgUJKLJoRx6uB0uYY8WcPWPyWlMgNtgnU8XKipmP76GxmAY1gDqV3p2LPcSCf_b1VsHoLY5ee4qLC0sxfowdVnsfOld2CxG3xmjNIa-Eh_TBu9DB-xQ5_e-CsNmTqxwFr3Br5F037-IY8NS/s1600-h/Laundry_powder_room_makeover1_051a_thumb%25255B6%25255D%25255B4%25255D.jpg "Laundry_powder_room_makeover1_051a_thumb[6]")
Wallpaper and baseboard in and ready for beadboard.

I wanted wood for the laundry room countertop. We used a sheet of finished plywood, trimmed it up and stained it. We used a Maple veneer finish. I love the look of Maple.

Because it’s plywood it comes with the usual ugly edges that need to be finished. We opted to use a subtle trim. With the edges concealed with the flawless transition from top to trim, it was ready to be stained. I used the same Minwax Walnut stain that I used on the Antique Vanity top going on the other side of the room. The countertop was finished in Minwax Satin Ployurethane, while the counter on the vanity was a gloss finish.

I couldn’t have imagined that this countertop would turn out as wonderful as it did. I was really pleased with it. However, I was not pleased with the beadboard backsplash. It was dull and flat.

This is where I decided to do something quick and easy. I bought some Smart Tiles at Home Depot. This project was complete in a about an hour.

They’re really very easy to install.

With the addition of some trim, in just over an hour you’ll go from this…

to this


In the meantime, the antique buffet to be used for the bathroom vanity is coming along nicely.

Again I must reiterate that this antique was in poor shape. It had previously been modified and had issues with cracking and stability which we corrected.
Three drawers fronts were removed and reattached to allow for a sink to be dropped in.

I was lucky enough to have both brother in law plumbers at my house that day for the finishing touches on all plumbing issues.

* A SIDENOTE ON UGLY TILES *
Before we get to the final pictures I wanted to share with you something I learned about ugly bathroom tiles. This was a decision I wrestled with forever before starting this project, and something Mr. Charming and I totally disagreed on. Do we replace the floor tiles or not? Since I’m not totally comfortable with messing with tiles on our own, this would have been something to hire out. Paying someone to tile, having everything in an upheaval for at least a week, dust, dirt, unbearable living conditions, disposing of old tile and lets face it, just the cost of good new tiles alone….led me to the decision to keep my old tile. The tile itself was not in bad condition but the grout was impossible to clean. After using several products and concocting a few of my own cleaning mixtures that didn’t work, I finally found Grout Renew. It’s basically grout paint.

Armed with nothing more than a toothbrush and a damp rag, I set out to conquer this nasty floor and prove to Mr. Charming that keeping the tile was the right decision. (Haha... Mr. Charming reading this post: "HEY that's my toothbrush!")
The grout went from this…

to this, in no time at all. Following the very basic instructions on the bottle, it couldn’t be more simple. Brush on and wipe up excess with a damp rag.

With the floor cleaned up and everything in place, the transformation is astounding. I don’t have to keep the bathroom door closed anymore.
Come on in!


In the powder room area, I chose these Vintage Couture pictures.

There’s nothing on the wall over the toilet yet, but I’ll wait till I find something perfect for that area.


The old sink was perfect for this vanity.


Looking towards the laundry area

I chose the hot/cold water tap pictures for the laundry area


Aside from the door being open this room has no natural light, and although there is more than enough light in the room the pictures don’t quite capture the true color of the cabinets. They are most like the color pictured below.

The baskets above the cupboards hold most of my small crafting supplies, without taking up valuable cupboard space and being very easy to take with me to another room.

Again here is the before picture
HOVER YOUR MOUSE OVER THE PICTURE TO SEE THE AFTER
Before I sign off, I wanted to bring to your attention that anytime I use the term ‘we’ in these posts I am referring to Mr. Charming as well as myself. He is such a huge part of what goes on behind the scenes and I don’t pretend to present these large renovation projects as my own. Without him these projects would be 20 x more costly to hire out. Thankfully plumbing was all the help we needed and with that an enormous and heartfelt thank you goes out to Frank and Tony for their knowledge, skill, advice and as always, their wonderful company. Love you guys !
That’s it for now!
Linked up to:
Furniture Feature Friday Frugalicious Friday Show and Tell Friday Frugal Friday Feathered Nest Friday Show Off Friday HodgePodge Friday Create and Share Flaunt it Friday Weekend Wrap Up Saturday Nite Special Sundae Scoop Metamorphosis Monday DIY Showoff Market Yourself Monday Made By You Monday Nifty Thrifty Tuesday Talent Tuesday Show Me What Ya Got Power of Paint Party Create and Share Wow us Wednesdays Home is Where the Heart Is Hookin up with HOH Transformation Thursday Time Travel Thursday


This comment has been removed by the author.
ReplyDeletewow, that is just gorgeous! You did an amazing job :)
ReplyDeleteTotal wow. Great job and I love that you used grout paint. Brilliant.
ReplyDeleteOh my word, this is amazing. Your new vanity is stunning and the entire bathroom looks amazing. I can't even begin to explain how fabulous the laundry is. Gorgeous. Hugs, Marty
ReplyDeleteWOW! This makes me want to enclose my washer and dryer. BEAUTIFUL
ReplyDeleteFabulous do-over!!!! Where did you purchase Grout Renew? Loved the undermount lighting. Will you tell me more about this, ie brand and source? TYA Frani cobfswillis@yahoo.com
ReplyDeleteBeautifully done, Lisa! I used that grout paint years ago ~ after we had a puffback and our beautiful new tile and grout got soot on it. Love the way the dresser turned out for the vanity. The little tub with greenery on the toilet tank made me smile ~ perfect for a bathroom.
ReplyDeleteAmazing! I LOVE how you concealed your laundry room AND your new vanity in Le Bain :) Absolutely love it!
ReplyDeleteLove your makeovers! Hey do those stick on tiles feel like plastic? I've been meaning to check them out but never remember when I'm in Home Depot...
ReplyDeletetruly beautiful. you should be so proud!
ReplyDeleteWow! You did an amazing job! I wonder if Grout Renew can be used to cover old eighties brown grout or if the dark color would show through. Did you glaze the cabinet doors or did you use a dark wax?
ReplyDeleteLove it! I really like how you covered up the washer and dryer. I may have to steal that idea someday!
ReplyDeleteAmazing job. Good call on the Smart Tiles. Having one plumber in the family is great but two sounds like a renovators dreams
ReplyDeleteOh!! It's amazing. I love it.
ReplyDeleteBeautiful! Ya'll did a great job.
ReplyDeleteIt looks wonderful...like the doors hiding the washer and dryer and I like the top you created. Glad you found something that worked for you with the tile. I would have been with your husband....I hate grout lines!
ReplyDeleteI love the whole thing...I do have a question. What was the grade of the plywood you used? We are going to do much the same thing to our pd. room and are not sure what kind of wood to use. Was this a furniture grade plywood?
ReplyDeleteThanks,
Lin
lins_1108@verizon.net
So gorgeous! I love that piece- what a fantastic idea!! Thanks for linking up at Feathered Nest Friday!
ReplyDeleteBeautiful transformation. You must be very pleased.
ReplyDeleteWhat amazing spaces! I love both. Your pretty counter top is marverlous!Your bathroom is just beautiful and so is your laundry room.
ReplyDeletebe a sweetie,
Shelia ;)
WOW! This belongs on a television make-over. What a great job you did. Your new room is absolutely elegant...wouldn't think it was a laundry area at all. Gail (BibleLoveNotes.com)
ReplyDeleteWhat a gorgeous makeover! I've never seen one I like better. The vanity is wonderful, and the cupboards look great. Fabulous job!!!
ReplyDeleteWow! That is an amazing transformation! Great work! I'm sure that Mr. Charming had a lot to do with it!
ReplyDeleteAmazing job Lisa ~ love everything about the final reveal right down to the grout paint!
ReplyDeleteFabulous Makeover, you should be proud!
ReplyDeleteLisa, AWESOME AWESOME results. Beautiful to see. Thanx for sharing with us in blogland. Really think you guys did a terrific job!
ReplyDeleteGod bless and may your Summer be refreshing,
d from the prairie
absolutely beautiful and functional!
ReplyDeleteSo very pretty. Absolutely stunning makeover - you did a fantastic job and I thoroughly enjoyed the pictures and tour.
ReplyDeleteCindy
This comment has been removed by a blog administrator.
ReplyDeleteWelcome back Lisa! You guys did a fabulous job with the makeover!
ReplyDeleteA M A Z I N G ! A transformation to die 4!
ReplyDeleteSo looking for ideas on wardrobes...and hit on your blog...so now 40 minutes later...thought find her latest and let then you know!WOW and that is the word...WOW! you are amazing....WOWOWWOWOWOWOWOWO you are doing a great job...amazed how many great bloggers reside in the land up north....Canada...always have wanted to travel....
ReplyDeleteWow, what a transformation. Just gorgeous. I love the vanity and the way the washer and dryer are hidden behind doors. Great job!!
ReplyDeleteBeautiful!!! Like Kim said, I like how things are concealed.
ReplyDeleteThis is stunning! It looks fabulous as is, but it becomes magical when you consider the before. It almost makes me WANT to do laundry :). So clever from top to bottom!
ReplyDeleteAMAZING! this is just awesome it looks soooo good! really good! :) Way to go! Please come hang out and link up to our link party "Home is Where the Heart is" Please feel free to link up any posts you might want to share! :)
ReplyDeletehttp://www.homesteadsimple.com/home-is-where-the-heart-is-link-it-up-wednesdays-3/
Love love love the laundry makeover and yes, also love the sink upgrade. Great post.
ReplyDeletelooks amazing, can't wait to see the real thing...... me :) (Ren or Stimpy)
ReplyDeleteAmazing, Lisa!!!!!!!
ReplyDeleteThis is stunningly beautiful! I have always wanted to make a sink out of a dresser or buffet but couldn't fine one wide enough. Yours looks amazing!
ReplyDeleteThis really turned out beautifully and the antique buffet is a wonderful part of the transition.
ReplyDeleteOH MY! What a beautiful job! I am speechless! I love the hidden appliances and the sink/vanity? Gorgeous! A stunning transformation, Lisa! I'm going to include a link back in this week's highlights. ;) Have a great week! Thanks for sharing your hard work!
ReplyDeleteThis is the most beautiful laundry / power room I have ever seen ! Your choices are amazing !! a friend just redid an antique table for their new bathroom but I have not gotten over to see it yet ! You and Mr Charming are an amazing team !
ReplyDeletewow, that is just gorgeous! Love the "new" vanity and how you redid the laundry area. Wonderful!
ReplyDeleteAmazing transformation. I love the washer and dryer hidden behind the cabinet doors. I've always loved furniture turned vanity, but I've never been brave enough to try. Way to go!
ReplyDeleteI just wanted to stop by and say Thank you for linking up to "Home is Where the Heart is" Our link party is a great one because of you! We'd love to have you link up this week too! The party is open now! http://www.homesteadsimple.com/home-is-where-the-heart-is-link-it-up-wednesdays-4/
ReplyDeletePS.
You've been featured! :)
Loved the colors, loved the vanity, loved the countertops, loved everything. Took my breath away it's such a beautiful transformation.
ReplyDeleteStopping over from your feature at Savvy Southern Style. This is a fantastic redo. I'm pinning the laundry, and I hope your husband didn't accidentally use his toothbrush. I think painting with it was a step above using it to scrub the toilet.
ReplyDelete~Bliss~
haha! I love him to death, and that's why he got a brand new toothbrush the day before I used his old one. It was just a hoot to hear him yell that when he was reading the post..lol
DeleteAwesome! Job well done....It is amazing and wonderful....thanks for sharing!
ReplyDeleteNancy
http://wildoakdesigns.blogspot.com
Amazing transformation.
ReplyDeleteThis room is now TOTALLY gorgeous!!! I love it and I know you do, too!
ReplyDeleteHugs, Cindy
Wow!! I a mesmerised. I am hosting a Giveaway to win a 50 dollar gift card to the store HomeGoods. It would be great if you stopped by and entered. Thanks Anu
ReplyDeleteLove the way you transformed your laundry space! Great idea to cover the appliances too! That vanity is just lovely!
ReplyDeleteAbsolutely beautiful and such a great idea with the appliances ! I so love the the "new" vanity , it turned out gorgeous !
ReplyDeletevery pretty and what a wonderful ideas you have..you have done a great job and you have transformed it well and you have gave us a great tips.
ReplyDeletelaundry tap set
The power room and laundry look great! Love how you hid the laundry behind those beautiful cabinets. I saw your comment on Centsational girl that you going to Montreal. As a Montrealer I wanted to suggest to you to spend and afternoon shopping on St. Denis boulevard starting south from Mont-Royal. It's a great place to shop for clothes and house decor. This is in addition to old Montreal featured in Centsational girl's pic. Hope you enjoy our city!
ReplyDeleteNew follower:)
Shut Up!!!!! Lisa!!!! This is amazing!! AH-MAZING! I can'at decide what I love the most! The countertop on the vanity and that sink....and the vanity....and the cabinet with the washer and dryer and that whole area....and the paint....
ReplyDeleteyou never cease to amaze me! I love it!
I'm moving to Canada....
Southern girl goes WAY north.....
move over ya'll...
Great job!
Lou Cinda :)
What an amazing makeover!
ReplyDeleteWow! That is a stunning change! The new layouts are amazing! I love all your great makeovers!
ReplyDeleteThis is a charming site and the redone laundry/bathroom is wonderful. You have given me some great ideas and will be visiting this often. Thank you.
ReplyDeleteI would love to start following you! How can I do this?
ReplyDeleteHi There
DeleteIf you would like to have any new Recaptured Charm posts emailed to you, you can subscribe to do so. At the top right sidebar (near top of page) you can fill in your email address in the box where it says subscribe by email. That is the easiest way to follow along. My average posting frequency is not more than 2 posts per month, so you won't be jammed with emails. Thanks, Lisa.
This is the first time I have had a NEW idea about what to do with my dysfunctional laundry area that is inside of my dining room. I've had bifold doors...etc. Sticks out like an odd thumb! Right now I took down the ugly bifold doors when I did a cottage makeover...and was going to look into making some old vintage style barn doors...but seeing this seems like I can USE this space instead of hide it! I will have to buy new Washing and drying machine even though they are front load all of their controls etc are on the top! But that makes me so excited to have a new idea.....Will make my dining room seem sooo much bigger! Sometime I'll have to send you a picture of before and after (might take awhile before I can afford the work as well as new washer/dryer! Thank you for sharing.
ReplyDeleteGorgeous remodeling, what an awesome idea...thanks for sharing.
ReplyDeleteWas the base cabinet beside the w/d made or bought at the height? I'm having trouble finding tall base cabinets to match the height of my w/d. Thanks
ReplyDeleteHi Kasey
DeleteThe base cabinet beside the machines was lifted to the height needed to match the machines. A kick plate was made to hide the 2 x 4 platform it sits on. Same with the dryer actually. Since the dryer was lower than the washer. A 2 x 4 platform was used to prop it up. Thanks, Lisa
I absolutely LOVE the vanity...would you please give me the directions to do this? thanks so much!!! maria.hudson617@yahoo.com....Maria
ReplyDeleteIt would be a dream to recreate the countertop you created over your washer/dryer. How did you frame it out or attach it to the wall? Is it lying right on top of the w/d?
ReplyDeleteZoua
Hello Zoua. The countertop was attached with 1 x 2 wood braces underneath. Attach the braces to the underside of the countertop and then screw them to the studs on all three walls. The counter is actually an inch or two above the machines, just in case we need to get the machines out one day.
DeleteLisa, we are planning on building this for our laundry room. How did you attach the W/D doors? Deb.mays@yahoo.com
ReplyDeleteWe don't have a laundry room, and the hookups for the appliances are in the kitchen. When I replaced the appliances I went with an LG all in one and it matches the white fridge/stove/micro etc. Since the kitchen faces the living room, I still want to enclose the washer with a more 'cabinetry' look that you have achieved here. I lack know how in wood crafting so it is an intimidating project for me, but I' really love what you've done it's really gorgeous. I guess I'll have to gear up my courage and plunge in! Great job here!
ReplyDeletehow is the grout on your bathroom tile holding up
ReplyDeleteActually very well. The grout is a little rougher so it might collect dust quicker, but quick washes cleans it perfectly
DeleteThanks for sharing such a useful post.
ReplyDelete